NITECORE Tini 2 Rechargeable Keychain Light (Limited Edition) Benutzerhandbuch
Tini2/tini2 ss/tini2 ti, Dual-core intelligent keychain light, Sysmax innovations co., ltd
(English)
Features
Specifications
Accessory
Technical Data
Charging Function
Operating Instructions
(Español)
(Deutsch)
(Francais)
TINI2/TINI2 SS/TINI2 Ti
• Multifunctional OLED Real-Time Display
• USB-C Charging
• Advanced Power Cut-Off (APC) Technology
Dual-Core Intelligent Keychain Light
• Utilizes 2 x OSRAM P8 LEDs with a max output of 500 lumens
• Max peak beam intensity of 2,000cd and max throw of 89 meters
• Utilizes a total reflective optic lens for uniform and soft light
• Multifunctional OLED real-time display for lumens, battery voltage and
runtime etc.
• Built-in 280mAh Li-ion battery
• Advanced Power Cut-Off (APC) technology for an ultra-low standby power
consumption
• Built-in Li-ion battery charging circuit with a USB-C port
•
Highly efficient constant current circuit provides a stable output up to 60 hours
• 2 user modes available (DEMO Mode and DAILY Mode)
• Dual side switch design
• 5 brightness levels available with direct access to TURBO
• Intelligent mode memory function
• 2 lockout modes available (Half Lockout Mode and Full Lockout Mode)
• Incorporated Advanced Temperature Regulation (ATR) module
(Patent No. ZL201510534543.6)
• Metal ring pull able to withstand up to 30 kilograms of weight
• TINI2: Aero grade aluminum alloy with HA III hard-anodized finish
TINI2 SS: Stainless steel by PVD (Physical Vapor Deposition) titanium coating
TINI2 Ti: Titanium body formed by stamping technology
• Impact resistant to 1 meter
Size:
46.6mm×25mm×12.5mm (1.83” Ч0.98” Ч0.49”)
Weight: TINI2: 18.8g (0.66oz)
TINI2 SS: 26g (0.92oz)
TINI2 Ti: 21.5g (0.76oz)
Key Clasp
FL1
STANDARD
TURBO
HIGH
MID
LOW
ULTRALOW
500 Lumens 200 Lumens
65 Lumens 15 Lumens 1 Lumen
*15min
45min
2h 30min
8h
60h
89m
56m
32m
14m
6m
2,000cd
800cd
260cd
55cd
9cd
1m (Impact Resistance)
IP54
Note:
The stated data is measured in accordance with the international
flashlight testing standards ANSI/PLATO FL 1-2019, using the built-in Li-ion
battery (280mAh) under laboratory conditions. The data may vary in real world
use due to different battery usage or environmental conditions.
* The runtime of TURBO is tested without the temperature regulation.
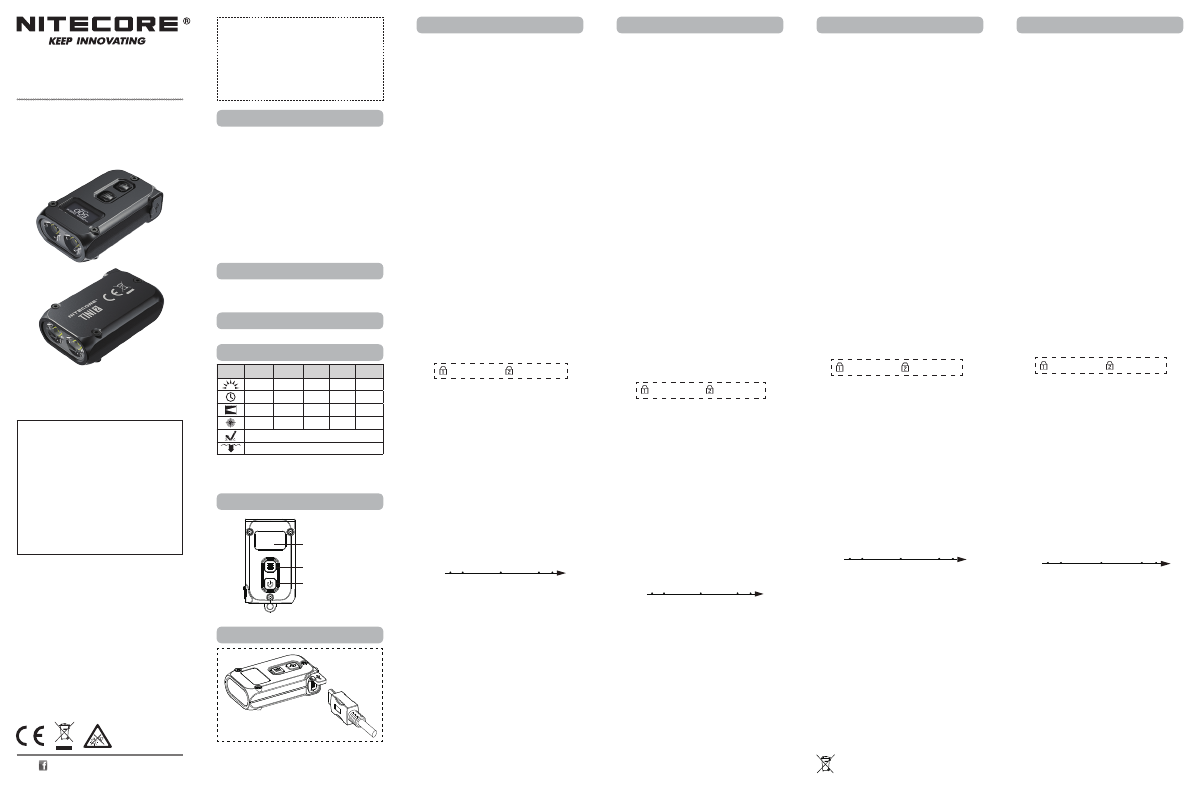
OLED Display
Mode Button
Power Button
Q&A
Q: Why does my TINI2/TINI2 SS/TINI2 Ti shut down in 30 seconds?
A: TINI2/TINI2 SS/TINI2 Ti has 2 user modes, DEMO Mode and DAILY
Mode. The default setting is DEMO Mode where the product will
automatically shut down if there is no operation in 30 seconds. It is
recommended to switch it to DAILY Mode when in daily use. Please
follow the steps below for mode switching:
1. When the light is on/off, long press both the Power Button and the
Mode Button simultaneously to switch between DEMO and DAILY
Mode.
2. The LED will flash to indicate the current user mode: 1 flash to
indicate DEMO Mode and 2 flashes to indicate DAILY Mode.
Warranty Service
All NITECORE
®
products are warranted for quality. Any DOA / defective
product can be exchanged for a replacement through a local distributor/
dealer within 15 days of purchase. After that, all defective / malfunctioning
NITECORE
®
products can be repaired free of charge within 24 months
from the date of purchase. Beyond 24 months, a limited warranty applies,
covering the cost of labor and maintenance, but not the cost of accessories
or replacement parts.
The warranty will be nullified if
1. he product(s) is/are broken down, reconstructed and/or modified by
unauthorized parties;
2. the product(s) is/are damaged due to improper use.
For the latest information on NITECORE
®
products and services, please
contact a local NITECORE
®
distributor or send an email to service@
nitecore.com
※ All images, texts and statements specified herein this user manual are
for reference purposes only. Should any discrepancy occur between
this manual and information specified on www.nitecore.com, Sysmax
Innovations Co., Ltd. reserves the rights to interpret and amend the
content of this document at any time without prior notice.
Operating Instructions
Multifunctional OLED Display
TINI2/TINI2 SS/TINI2 Ti is equipped with a multifunctional OLED display. (Please
remove the screen protector before the first use.) When the light is turned on,
the screen will successively show the current info (Brightness Level & Lumens,
Runtime Remaining, User Mode) before it goes out. After the screen goes out,
short pressing the Mode Button can reactivate the screen.
Display Demonstration Function
• This function is used for demonstration ONLY. It does not reflect the actual
light status.
• When the light is off, press and hold the power button even after the
light accesses ULTRALOW until the light is turned off to enter the display
demonstration.
• In this status, the screen will cycle through various informational displays.
Short press either button to exit this status.
On / Off
On: When the light is off, short press the Power Button to turn it on.
Off: When the light is on, short press the Power Button to turn it off.
User Modes
TINI2/TINI2 SS/TINI2 Ti has 2 user modes, DEMO Mode and DAILY Mode.
DEMO Mode:
The light will automatically shut down if there is no operation in
30 seconds (reactivating the screen excluded). The countdown will be displayed
on the screen.
DAILY Mode:
The light will not automatically shut down and will need to be
shut down manually.
Note:
The default setting is DEMO Mode. It is recommended to switch it to
DAILY Mode when in daily use.
Mode Switching
When the light is on/off, long press both the Power Button and the Mode Button
simultaneously to switch between DEMO and DAILY Mode.
The LED will flash to indicate the current user mode: 1 flash to indicate DEMO
Mode and 2 flashes to indicate DAILY Mode.
(In this process, the screen will show “DEMO” or “DAILY” to indicate the current
user mode.)
Note:
Reactivating the light within 3 seconds after it automatically shuts down
in DEMO mode will temporarily access DAILY Mode until it is turned off.
Brightness Levels
When the light and the screen is on, short press the Mode Button to cycle
through “ULTRALOW – LOW – MID - HIGH”. The flashlight will directly access
the previously memorized brightness level when reactivated.
Note:
When the screen is off, short press the Mode Button to activate the
screen before adjusting the brightness level.
Direct Access to ULTRALOW
When the light is off, long press the Power Button to directly access ULTRALOW.
Direct Access to TURBO
When the light is on/off, press and hold the Mode Button to access TURBO.
Release to return to previous status.
Lockout / Unlock
TINI2/TINI2 SS/TINI2 Ti has two lockout modes (Half Lockout Mode and Full
Lockout Mode).
Half Lockout Mode (Lockout 1):
• When the light is on, press and hold the Power Button until the screen shows
the Lockout 1 icon to access Half Lockout Mode.
• When in Half Lockout Mode, the Power Button is unavailable to activate the
flashlight. Holding the Mode Button is still available for accessing TURBO.
Full Lockout Mode (Lockout 2):
• When the light is on, press and hold the Power Button even after accessing
Half Lockout Mode, until the screen shows Lockout 2 icon to access Full
Lockout Mode.
• When in Full Lockout Mode, both buttons are unavailable to activate the
flashlight.
Unlock:
• In either Lockout Mode, short press and then long press the Power Button,
during which the screen will show an unlock icon and a progress bar, until
the flashlight is activated to exit Lockout Mode. The light will access the
previous memorized level.
• The light will be automatically unlocked when being recharged in either
Lockout Mode.
ATR (Advanced Temperature Regulation)
The integrated ATR technology regulates the output of the TINI2/TINI2 SS/
TINI2 Ti according to the working condition and ambient environment to
maintain the optimal performance.
Power Indication
When the light is off, short press the Mode Button to display the battery level,
the battery voltage, the memorized brightness level and the current user mode
before it goes out. Different voltages represent the corresponding remaining
battery power levels:
Note:
When the battery voltage is below 3.4V, the power indicator beneath
both buttons will flash blue every 2 seconds to inform the user to recharge the
battery as soon as possible.
Charging Function
TINI2/TINI2 SS/TINI2 Ti is equipped with an intelligent charging system. Please
charge the battery before the first use.
Connecting to the External Power:
As illustrated, use the USB cable to
connect an external power supply (e.g. a USB adapter, a computer or other USB
charging devices) to the USB port to begin the charging process. The charging
time is approx. 1 hour 45 minutes.
Charging Indicator:
When the charging status is normal, the charging
indicator will flash slowly to inform the user and the screen will show the
current battery level. When the battery is fully charged, the charging indicator
will become steadily turned on to inform the user and the screen will display a
full battery level.
Cautions
1. The TURBO Brightness Level of 500 lumens will produce massive heat
rapidly during long-time activation. Use caution when operating the light in
TURBO mode to avoid overheating and step down to a lower level if the light
becomes too hot to handle.
2. CAUTION! Possible dangerous radiation! Don't look into the light! May be
dangerous for your eyes.
3. Please recharge the product every 3 months when left unused for a
prolonged time.
4. The product contains small assembly parts. Please keep it away from children
to avoid danger of choking or suffocation.
5. When the flashlight is kept in the backpack, please activate the Lockout Mode
to prevent accidental activation.
6. DO NOT disassemble, modify or reconstruct the product, otherwise the
warranty will be nullified, and the product might be damaged.
(Half Lockout Mode)
(Full Lockout Mode)
Low power
Full power
3.5V 3.7V 3.9V 4.2V
Instrucciones de operación
Pantalla OLED multifuncional
La TINI2/TINI2 SS/TINI2 Ti está equipada con una pantalla OLED
multifuncional. (Por favor remueva el protector de la pantalla antes del
primer uso). Cuando la linterna está encendida, la pantalla mostrará lenta y
sucesivamente la siguiente información (Nivel de intensidad y lúmenes, tiempo
de batería restante, modo de usuario) antes de apagarse. Después de apagarse
la pantalla, presione ligeramente el botón Mode para reactivar la pantalla.
Función de demostración de la pantalla
• Está función es usada SÓLO para demostración. No refleja el estado actual
de la linterna.
• Cuando la luz está apagada, presione y mantenga presionado el botón de
encendido, incluso después de que la linterna entre al modo ULTRABAJO y
hasta que la luz se apague, esto para entrar al modo de demostración.
• En este estado, la pantalla cambiará entre varias pantallas informativas.
Presione ligeramente cualquier botón para salir de este estado.
On / Off
Encendido: Cuando la luz está apagada, presione ligeramente el botón de
encendido para encender.
Apagado: Cuando la luz está encendida, presione ligeramente el botón de
encendido para apagar.
Modos de usuario
La TINI2/TINI2 SS/TINI2 Ti tiene 2 modos de usuario, modo DEMO y modo DAILY.
Modo DEMO:
La luz automáticamente se apagará si no se realiza ninguna
operación en 30 segundos (excluyendo la reactivación de la pantalla). La cuenta
regresiva se mostrará en la pantalla.
Modo DAILY:
La linterna no se apagará automáticamente y tiene que
apagarse manualmente.
Nota:
La configuración predeterminada es el modo DEMO. Es recomendable
cambiar la linterna a modo DAILY para el uso diario.
Cambio de modos
Cuando la linterna está encendida/apagada, mantenga presionados ambos
botones simultáneamente para cambiar entre el modo DEMO y DAILY. El LED
parpadeará para indicar el modo actual: 1 parpadeo indica el modo DEMO y 2
parpadeos indican el modo DAILY. (En este proceso, la pantalla mostrará “DEMO”
o “DAILY” para indicar el modo actual).
Nota:
Reactivar la linterna dentro de los 3 segundos siguientes después de que
se apagó automáticamente en modo DEMO, activará temporalmente el modo
DAILY hasta que sea apagada.
Niveles de intensidad
Cuando la luz y la pantalla están encendidas, presione el botón Mode para cambiar
entre “ULTRABAJO – BAJO – MED- ALTO”. La linterna accederá directamente al
nivel de intensidad memorizado previamente cuando sea reactivada.
Nota:
Cuando la pantalla está apagada, presione el botón MODE para activar la
pantalla antes de ajustar el nivel de intensidad.
Acceso directo a ULTRABAJO
Cuando la luz está apagada, mantenga presionado el botón de encendido para
entrar directamente al modo ULTRABAJO.
Acceso directo a TURBO
Cuando la luz está encendida/apagada, presione y mantenga presionado el
botón Mode para entrar directamente al modo TURBO. Suelte el botón para
regresar al estado anterior.
Bloqueo / Desbloqueo
La TINI2/TINI2 SS/TINI2 Ti tiene 2 modos de bloqueo (Modo de medio bloqueo
y modo de bloqueo completo).
Modo de medio bloqueo (Lockout 1):
• Cuando la luz está encendida, presione y mantenga presionado el botón de
encendido hasta que la pantalla muestre el icono Lockout1 para entrar al
modo de medio bloqueo.
• Cuando está en modo de medio bloqueo, el botón de encendido es incapaz
de activar la linterna. Mantener presionado el botón Mode estará disponible
para accesar al modo TURBO.
Modo de bloqueo complete (Lockout 2):
•
Cuando la luz está encendida, presione y mantenga presionado el botón de
encendido incluso después de acceder al modo de medio bloqueo, hasta que la
pantalla muestre el icono Lockout 2 para acceder al modo de bloqueo completo.
• Cuando está en modo de bloqueo completo, ambos botones serán incapaces
de activar la linterna.
Desbloqueo:
•
En cualquier modo de bloqueo, presione ligeramente y después mantenga
presionado el botón de encendido, durante ese tiempo la pantalla mostrará un
icono de desbloqueo y una barra de progreso, hasta que la linterna se active y
salga del modo de bloqueo. La luz encenderá en el nivel previamente memorizado.
• La linterna se desbloquea automáticamente cuando se recargue en
cualquiera de los modos de bloqueo.
ATR (Advanced Temperature Regulation)
La tecnología ATR integrada regula la potencia de la TINI2/TINI2 SS/TINI2 Ti
de acuerdo a las condiciones de trabajo y medio ambiente para mantener un
rendimiento óptimo.
Indicador de batería
Cuando la luz está apagada, presione brevemente el botón Mode para mostrar
el nivel de batería, el voltaje de batería, el nivel de intensidad memorizado y el
modo de usuario actual antes de que se apague. Diferentes voltajes representan
el nivel de batería restante correspondiente:
Nota:
Cuando el nivel de batería es inferior a 3.4V, el indicador de batería
debajo de ambos botones parpadeará con una luz azul cada 2 segundos para
informar al usuario que necesita recargar la batería lo antes posible.
Función de carga
La TINI2/TINI2 SS/TINI2 Ti está equipada con un sistema de carga inteligente.
Por favor cargue la batería antes del primer uso.
Conexión a una fuente de alimentación externa:
Como se muestra en la
imagen, utilice el cable USB para conectar una fuente de alimentación externa
(por ejemplo: un adaptador USB, una computadora u otros dispositivos de carga
USB) al puerto USB para comenzar el proceso de carga. El tiempo de carga es
de aproximadamente 1h 45min.
Indicador de carga:
Cuando el estado de carga es normal, el indicador de
carga parpadeará lentamente para informar al usuario y la pantalla mostrará
en nivel de batería actual. Cuando la batería esté completamente cargada, el
indicador de carga permanecerá encendido para informar al usuario y la pantalla
mostrará un nivel completo de batería.
Precauciones
1. El nivel de intensidad TURBO de 500 lúmenes producirá mucho calor
rápidamente durante periodos prolongados de activación. Tenga cuidado al
operar la linterna en modo TURBO para evitar sobrecalentamiento y baje a un
nivel inferior si la linterna se calienta demasiado como para no poder manejarla.
2. ¡PRECAUCIÓN! Posible radiación peligrosa, NO mire directo a la luz, puede
ser peligroso para sus ojos.
3. Por favor recargue el producto cada 3 meses cuando lo deje sin usar por
periodos prolongados de tiempo.
4. El producto contiene partes pequeñas. Por favor manténgalo fuera del
alcance de los niños para evitar riesgo de asfixia.
5. Cuando deje la linterna en una mochila, por favor active el modo de bloqueo
para prevenir activación accidental.
6. NO desarme, modifique o reconstruya el producto, de lo contrario se anulará
la garantía, y el producto podría resultar dañado.
(Half Lockout Mode)
(Full Lockout Mode)
Low power
Full power
3.5V 3.7V 3.9V 4.2V
Bedienungsanleitung
Multifunktionales OLE-Display
Die TINI2/TINI2 SS/TINI2 Ti ist mit einem multifunktionalen OLE-Display
ausgestattet. (Bitte vor dem ersten Gebrauch die Schutzfolie entfernen.) Wenn
das Licht eingeschaltet wird, zeigt das Display nacheinander die aktuellen
Informationen (Helligkeitsstufe, Lumen, verbleibende Leuchtzeit und Benutzer-
Mode) an, bevor es erlischt. Wenn das Display erlischt, kann es im DAILY-Mode
durch kurzes Drücken der Mode-Taste reaktiviert werden.
Display Demonstrations-Funktion
● Diese Funktion wird AUSSCHLIESSLICH zur Demonstration verwendet.
● Wenn das Licht aus ist, halten Sie den Ein-/Ausschalter gedrückt, auch wenn
die Lampe auf ULTRALOW zugreift, bis das Licht ausgeschaltet wird, um die
Display-Demo-Funktion zu aktivieren.
● In diesem Status durchläuft das Display verschiedene Informationsanzeigen.
Drücken Sie kurz eine der beiden Tasten, um diesen Status zu verlassen.
Ein-/Ausschalten
Einschalten: Wenn das Licht ausgeschaltet ist, drücken Sie kurz den Ein-/
Ausschalter, um das Licht einzuschalten.
Ausschalten: Wenn das Licht eingeschaltet ist, drücken Sie kurz den Ein-/
Ausschalter, um das Licht auszuschalten.
Mode-Arten
Die TINI2/TINI2 SS/TINI2 Ti verfügt über einen DEMO-Mode und einen DAILY-Mode.
DEMO-Mode:
Das Licht schaltet sich automatisch aus, wenn 30 Sekunden lang
keine Eingabe erfolgt ist (das Reaktivieren des Bildschirms ist ausgeschlossen).
Der Countdown wird auf dem Display angezeigt.
DAILY-Mode:
Das Licht wird nicht automatisch ausgeschaltet und muss
manuell ausgeschaltet werden.
HINWEIS:
Die Standardeinstellung ist DEMO-Mode. Es wird empfohlen, im
täglichen Gebrauch auf den DAILY-Mode umzuschalten.
Mode-Auswahl
Drücken Sie lange gleichzeitig die Ein-/Aus-Taste zusammen mit der Mode-Taste,
um zwischen DEMO- und DAILY-Mode zu wechseln. Die LED zeigt durch blinken
den aktuellen Benutzermode an: 1 Mal Blinken bedeutet DEMO-Mode und 2
Mal Blinken bedeutet DAILY-Mode. (In diesem Prozess wird auf dem Bildschirm
"DEMO" oder "DAILY" angezeigt, um den aktuellen Benutzermodus anzuzeigen.)
HINWEIS:
Wenn Sie das Licht innerhalb von 3 Sekunden nach dem
automatischen ausschalten im DEMO-Mode erneut aktivieren, wird
vorübergehend auf den DAILY-Mode zugegriffen, bis er ausgeschaltet wird.
Wechsel der Helligkeitsstufen
Wenn das Licht und das Display eingeschaltet sind, drücken Sie kurz und
wiederholt die Mode-Taste, um fortlaufend durch die Modi "ULTRALOW" - "LOW"
- "MID" - "HIGH" zu schalten. Die Taschenlampe wird direkt auf die zuvor
genutzte, gespeicherte Helligkeitsstufe zugreifen, wenn sie erneut aktiviert wird.
Hinweis:
Wenn das Display ausgeschaltet ist, drücken Sie kurz die Mode-Taste,
um das Display zu reaktivieren, bevor Sie die Helligkeitsstufe einstellen.
Direkter Zugang zu ULTRALOW
Wenn das Licht aus ist, drücken Sie lange auf den Ein-/Ausschalter, um direkt
auf "ULTRALOW" zuzugreifen
Direkter Zugang zu TURBO
Drücken und halten Sie die Mode-Taste, um auf "TURBO" zuzugreifen. Lassen
Sie sie los, um zum vorherigen Status zurückzukehren.
Sperren / Entsperren
Die TINI2/TINI2 SS/TINI2 Ti hat zwei Sperrmodi: (Half Lockout Mode und Full
Lockout Mode).
Halber Sperr-Mode (Lockout 1):
● Wenn das Licht an ist, drücken und halten Sie die Ein-/Aus-Taste, bis auf dem
Display das Symbol "Lockout 1" angezeigt wird, um den Mode "Half Lockout"
aufzurufen.
● Im Half Lockout-Mode ist die Einschalttaste nicht verfügbar, um die
Taschenlampe zu aktivieren. Das Halten der Mode-Taste ist weiterhin für den
Zugriff auf TURBO verfügbar.
Voller Sperr-Mode (Lockout 2):
● Wenn das Licht an ist, drücken und halten Sie die Ein-/Aus-Taste auch
nach dem Zugriff auf den Mode "Half Lockout", bis das Display "Lockout 2"
anzeigt, um in den Mode "Full Lockout" zu gelangen.
● Im Vollsperr-Mode sind beide Tasten zum Aktivieren der Taschenlampe nicht
verfügbar.
Entsperren:
● Drücken Sie im Lockout-Mode erst kurz und dann lange auf die Ein-/Aus-Taste,
während das Display ein Entsperr-Symbol und einen Fortschrittsbalken anzeigt,
bis die Taschenlampe aktiviert wird, um den Sperr-Mode zu verlassen. Die Lampe
wird auf die vorher genutzte und gespeicherte Helligkeitsstufe zuzugreifen.
● Die Lampe wird automatisch entriegelt, wenn sie in einem der beiden
Sperrmodi aufgeladen wird.
ATR (Advanced Temperature Regulation)
Die automatische Temperaturregulierung (ATR) steuert die Ausgangsleistung
der TINI2/TINI2 SS/TINI2 Ti entsprechend den Bedingungen der Umgebung,
um eine optimale Leistung zu gewährleisten.
Leistungsanzeige
Wenn das Licht aus ist, drücken Sie kurz die Mode-Taste, um den Ladestand, die
Akkuspannung, die gespeicherte Helligkeitsstufe und den aktuellen Benutzermode
anzuzeigen, bevor das Display erlischt. Unterschiedliche Spannungen
repräsentieren die entsprechenden verbleibenden Batterieleistungspegel:
Hinweis:
Wenn die Batteriespannung unter 3,4 V liegt, blinkt die Stromanzeige
unter beiden Tasten alle 2 Sekunden blau, um den Benutzer zu informieren, den
Akku so bald wie möglich aufzuladen.
Laden
Die TINI2/TINI2 SS/TINI2 Ti ist mit einem intelligenten Ladesystem
ausgestattet. Bitte laden Sie den Akku vor dem ersten Gebrauch.
Anschließen an externe Stromversorgungen:
Verwenden Sie wie dargestellt das USB-Kabel, um eine externe Stromversorgung
(z. B. einen USB-Adapter, einen Computer oder andere USB-Ladegeräte) an den
USB-Anschluss anzuschließen, und den Ladevorgang zu starten. Die Ladezeit
beträgt ca. 1h 45min.
Ladnakedeanzeige:
Wenn der Ladezustand normal ist, blinkt die Ladeanzeige
langsam, und das Display zeigt den aktuellen Ladezustand an. Wenn der Akku
vollständig geladen ist, leuchtet die Ladeanzeige stetig und das Display zeigt
einen vollen Akkuladestand an.
VORSICHT
1. Der TURBO-Helligkeitsgrad von 500 Lumen erzeugt während einer
Langzeitaktivierung eine starke Hitze. Seien Sie vorsichtig, wenn Sie die
Lampe im TURBO-Mode betreiben, um eine Überhitzung zu vermeiden, und
gehen Sie auf eine niedrigere Stufe herunter. Es ist möglich, dass die Lampe
zu heiß wird, um sie in der Hand zu halten.
2. ACHTUNG! Möglicherweise gefährliche optische Strahlung! Bei Betrieb nicht
direkt in das Licht blicken. Kann für die Augen gefährlich sein.
3. Bitte laden Sie die Lampe alle 3 Monate auf, wenn Sie sie längere Zeit nicht
benutzt wird.
4. Die Lampe enthält kleine Montageteile. Bitte halten Sie sie von Kindern fern,
um eine Erstickungsgefahr zu vermeiden.
5. Wenn sich die Taschenlampe im Rucksack transportiert wird, schalten Sie
bitte in einen Sperrmodus, um eine versehentliche Aktivierung zu verhindern.
6. Zerlegen Sie die Lampe NICHT, und modifizieren oder manipulieren Sie sie nicht,
andernfalls erlischt die Garantie und das Produkt könnte beschädigt werden.
Entsorgung von Elektro- und Elektronikgeräten
Die durchgestrichene Mülltonne bedeutet, dass Sie gesetzlich verpflichtet
sind, diese Geräte einer vom unsortierten Siedlungsabfall getrennten
Erfassung zuzuführen. Die Entsorgung über die Restmülltonne oder die
gelbe Tonne ist untersagt. Enthalten die Produkte Batterien oder Akkus,
die nicht fest verbaut sind, müssen diese vor der Entsorgung entnommen
und getrennt als Batterie entsorgt werden.
(Half Lockout Mode)
(Full Lockout Mode)
Low power
Full power
3.5V 3.7V 3.9V 4.2V
SYSMAX Innovations Co., Ltd.
TEL:
+86-20-83862000
FAX:
+86-20-83882723
E-mail:
Web:
www.nitecore.com
Address
:
Unit 6355, 5/F, No. 1021 Gaopu Road,
Tianhe District, Guangzhou,
510653, Guangdong, China
Please find us on facebook : NITECORE Flashlight
Thanks for purchasing NITECORE!
TINI2804222
Made in China
Instructions
Ecran OLED multifonction
TINI2/TINI2 SS/TINI2 Ti est équipé d’un écran OLED multifonction. Retirer le
film protecteur avant l’utilisation. Lorsque la lampe est allumée, l'écran affiche
successivement les informations en temps réel (Niveau de luminosité et Lumens
→ Autonomie → Mode en cours) avant de s'éteindre. Une fois l’écran éteint,
appuyez brièvement sur le bouton Mode pour réactiver l’écran.
Fonction DEMO
• Cette fonction est utilisée pour la démonstration uniquement. Il ne reflète
pas le niveau actuel de la lumière.
• Lorsque la lumière est éteinte, maintenez longuement l’interrupteur enfoncé
jusqu'à ce que la lumière s’éteigne de nouveau pour entrer en démonstration.
• Dans cette fonction, l'écran affichera diverses informations. Appuyez
brièvement sur l'un des boutons pour quitter cette fonction.
ON/OFF
Pressez l’interrupteur pour allumer la lampe, et pressez à nouveau pour l’éteindre.
Modes
La lampe TINI2/TINI2 SS/TINI2 Ti possède deux modes. L’utilisateur peut
passer de l’un à l’autre selon ses préférences :
Mode DEMO :
Dans ce mode, la lampe reste allumée pendant 30 secondes
puis s’éteint automatiquement.
Mode DAILY (quotidien) :
Elle restera allumée jusqu’à extinction manuelle.
Note :
le mode DEMO est le mode par défaut, sortie usine. Il est conseillé de
passer en mode DAILY( quotidien)
Changement de mode
Quand la lampe TINI2/TINI2 SS/TINI2 Ti est éteinte, maintenir appuyé les
2 interrupteurs pour alterner entre les modes Demo et Quotidien. La led va
clignoter pour informer l’utilisateur : 1 flash pour le mode Demo, 2 flashes pour
le mode Quotidien.
L’écran affiche alors DEMO ou DAILY (pour quoditien).
NOTE :
dans le mode DEMO, la lampe reste allumée pendant 30 secondes puis
s’éteint. Rallumer la lampe dans les 3 secondes suivant un arrêt automatique
conduira à passer en mode DAILY momentanément.
Niveaux d’éclairage
Lorsque la lampe et l’écran sont allumés, pressez sur le bouton mode pour
ajuster la luminosité entre ULTRA-LOW (Ultra-Bas), LOW (Bas), MID (Moyen)
et HIGH ( Fort). La lampe possède une fonction mémoire qui permet de revenir
directement au dernier réglage utilisé au moment où la lampe a été éteinte.
Note :
quand l’écran est éteint, appuyer brièvement sur le bouton mode pour le
réactiver.
Accès Direct à ULTRALOW (Ultra-bas)
Quand la lampe est éteinte, appuyer longuement sur l’interrupteur pour accèder
au mode ULTRA-LOW (ultra-bas).
Accès direct au Turbo
Pressez et maintenez le bouton mode pour accéder au mode Turbo. Relâchez
les boutons pour revenir au niveau d’éclairage précédent.
Verrouillage / déverrouillage
TINI2/TINI2 SS/TINI2 Ti possède 2 modes de verrouillage : Half Lockout Mode
(partiel) Full Lock out Mode (complet)
Half Lockout Mode (verrouillage partiel) (Lockout 1):
• Quand la lampe est allumée, maintenir appuyé l’interrupteur jusqu’à ce que
l’écran affiche l’icône Lockout 1 pour accéder au mode verrouillage partiel.
• Dans ce mode, l’interrupteur ne permet d’activer la lampe. Le mode Turbo
est accessible en appuyant sur le bouton Mode.
Full Lockout mode (verrouillage complet) Lockout 2 :
• Quand la lampe est allumée, maintenir appuyé l’interrupteur jusqu’à ce que
l’écran affiche l’icône Lockout 2 pour accéder au mode verrouillage total.
• Dans ce mode, aucun bouton ne permet d’activer la lampe.
Déverrouillage :
• Dans chacun des modes de verrouillage, appuyer brièvement puis
longuement sur l’interrupteur, l’écran affichera l’icône de déverrouillage
avec une barre de progression jusqu’à ce que la lampe sorte du mode de
verrouillage. La lampe reviendra au mode mémorisé précedemment.
• La lampe sera automatiquement déverrouillée lorsqu'elle sera rechargée dans
l'un des modes de verrouillage.
ATR
Le système avancé de régulation de la température (ATR) permet à la lampe
d’ajuster de façon dynamique son niveau d’éclairage en fonction de sa
température. Cela permet d’éviter toute surchauffe de la lampe et d’augmenter
sa durée de vie.
Batterie
Lorsque la lampe est éteinte, appuyez brièvement sur le bouton de mode pour
afficher le niveau de la batterie, la tension de la batterie, le niveau de luminosité
mémorisé et le mode utilisateur actuel avant son extinction. Différentes tensions
représentent les niveaux de charge restants de la batterie
NOTE :
Lorsque la tension de la batterie est inférieure à 3,4 V, le voyant
d'alimentation situé sous les deux boutons clignote en bleu toutes les 2
secondes pour informer l'utilisateur de recharger la batterie dès que possible.
Charge
TINI2/TINI2 SS/TINI2 Ti est équipé d'un système de charge intelligent. Veuillez
charger la batterie avant la première utilisation.
1. Connectez la lampe à une source d’alimentation via le câble USB comme
illustré ci-contre. La charge complète de la batterie prend environ 1 heure 45
minutes.
2. Lorsque l'état de charge est normal, le voyant de charge clignote lentement
pour informer l'utilisateur et l'écran affiche le niveau actuel de la batterie.
Lorsque la batterie est complètement chargée, le voyant de charge reste
allumé pour informer l'utilisateur et l'écran affiche le niveau de charge de la
batterie.
Avertissement
1. Le niveau TURBO de 500 lumens va générer de la chaleur rapidement.
Faites preuve de prudence lorsque vous utilisez la lampe en mode TURBO
pour éviter toute surchauffe et descendez à un niveau inférieur si la lumière
devient trop chaude pour être manipulée.
2. ATTENTION! Rayonnement dangereux possible! Ne regardez pas la lumière
directement! Peut-être dangereux pour vos yeux.
3. Recharger le produit au minimum tous les 3 mois.
4. Le produit contient des petites pièces d’assemblage, éloignez-le des enfants
pour éviter tout risque d'étouffement.
5. Verrouiller la lampe lorsque vous la transportez dans un sac à dos pour éviter
toute activation accidentelle.
6. Ne pas désassembler, modifier et reconstruire le produit au risque d’annuler
de la garantie et d’endommager le produit.
(Half Lockout Mode)
(Full Lockout Mode)
Low power
Full power
3.5V 3.7V 3.9V 4.2V