Leica sf 60 – LEICA SF 60 Flash Benutzerhandbuch
Seite 2
Leica Camera AG
I
Am Leitz-Park 5
I
35578 WETZLAR
I
DEUTSCHLAND
I
Telefon +49 (0) 6441-2080-0
I
Telefax +49 (0) 6441-2080-333
I
www.leica-camera.com
LEICA SF
60
QUICK START GUIDE
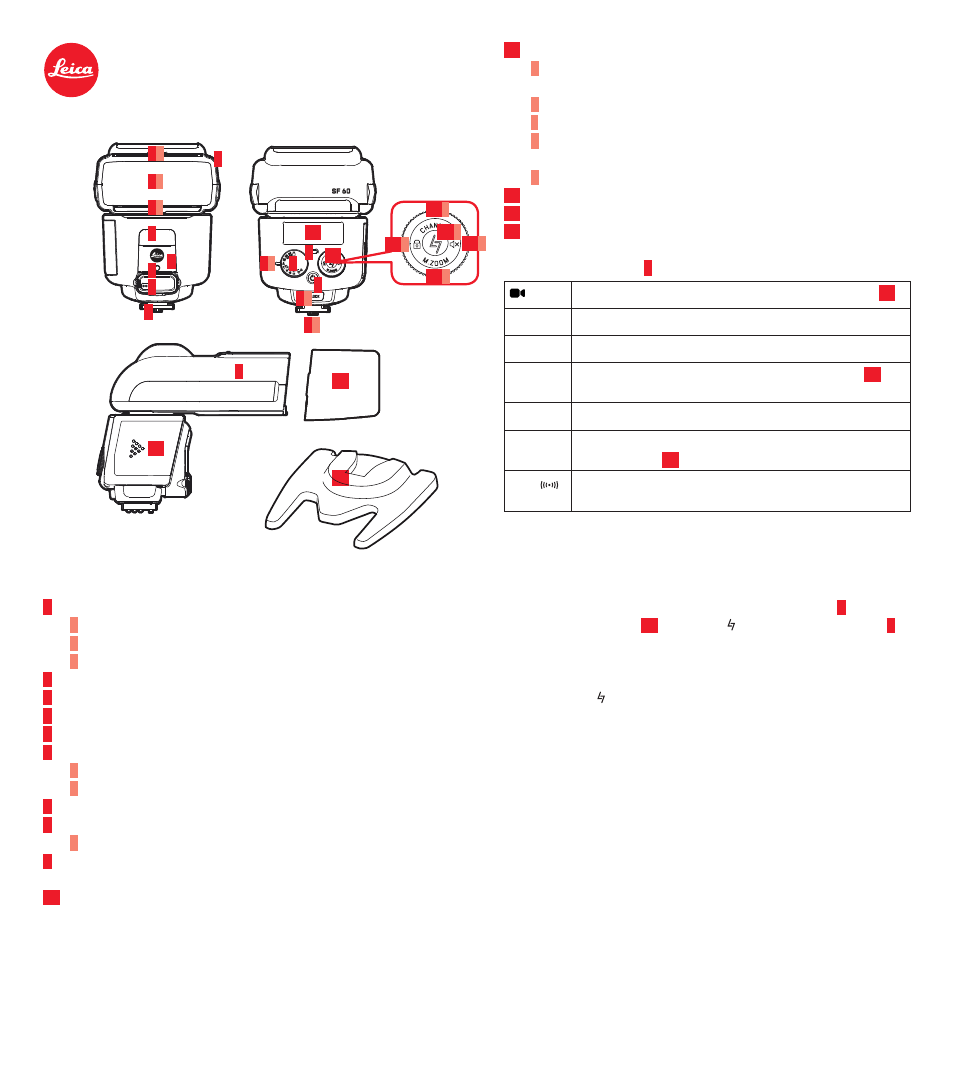
Names/Functions of the Main Components
1
Flash head, with
a
Diffusor screen
b
Reflector panel
c
Wideangle diffusor panel
2
Video light
3
Sensor for remote control
4
AF assist light
5
Socket for connection with external battery pack (behind cover)
6
Foot with
a
Unlock button
b
Lock pin
7
Main switch, press briefly to switch unit on or off
8
Mode dial, with
a
Index
9
Status LED/test flash button, green: flash ready, red flashing: flash
recharging, yellow flashing: pairing process in progress (see next section)
10
Monitor
11
Setting ring/rocker with function indications for
a
Channel selection, press 1 s during remote control mode to
access function, use setting ring to switch channels
b
Acoustic signal, press 1 s to turn off/on
c
Pairing, see last section
d
Zoom mode/ focal length, press 1 s to access function,
use setting ring to switch modes/select focal length
e
Setting ring lock, press 1 s to turn on/off
12
Battery compartment door
13
Soft box
14
Flash stand with ¼“ thread
Modes (see mode dial
8
)
Video light, 9 brightness levels selectable with setting ring
11
SF
Remote release without pre-flash
SD
Remote release with pre-flash
M
Manual setting, output level selectable with setting ring
11
,
(
1
⁄
1
to
1
⁄
256
in 0,3 EV increments)
A
Full automatic mode, flash exposure controlled by camera
TTL
Full automatic mode, flash exposure compensation selectable
with setting ring
11
(± 2 EV in 0,3 EV increments)
ABC
Wireless remote control, three flash groups with differing
settings selectable
Pairing Process with the Remote Control Unit Leica SF
C1
During the pairing process, both the Leica SF 60 and the Leica SF C1 must
not be mounted on the camera.
1. Switch the Leica SF 60 and the Leica SF C1 off
2. On the Leica SF 60, simultaneously press main switch
7
and
setting ring/rocker
11
centrally at (≥ 3 s) until its status LED
9
flashes yellow and a regular beep sounds
3. After that, while the flash’s status LED keeps flashing, simultane-
ously press the Leica SF C1’s main switch and setting ring/rocker
centrally at (≥ 3 s) until its status LED also flashes yellow
4. A successful pairing is indicated by the end of the flashing and
beeping.
Notes:
• Before starting the pairing process, make sure both the Leica SF 60
and the Leica SF C1 are set to automatic channel selection.
• Do not carry out any other settings on any of the respective units
during the pairing process.
• A successful pairing remains active even if any of the respective units
is switched off and on again.
Further details on the pairing process and the remote control functions
can be found in the respective units’ comprehensive instructions which
are available for download on the Leica Camera AG homepage.
1
1a
1b
1c
2
3
4
5
6
7
8
9
10
8a
6a
6b
11
11a
11b
11c
11e
11d
1
12
13
14